How to Make an iPhone tripod Mount
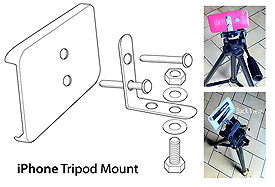
This tripod mount will work for almost any smart phone iPhone or iPod. The design can be easily adapted to fit your device. The nut and bolt fit through the tripod block in place of the original screw supplied to provide a secure attachment to the tripod base.
You will need: a phone cover, a metal L plate, nut, bolt and a couple of washers, 2 split pins, some tape and a drill.
The Cover: Choose a phone cover that covers the back of your device securely. They can be purchased cheaply at the local phone store or online.
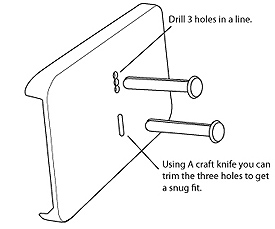
Drill: Although the diagram above shows 2 holes cut in the phone cover it gives more strength to the mount if you drill two slots. This can be done by drilling 2 or 3 holes vertically and cut them to fit the split pin blade size for a snug fit
iphone 4 4s cover from 2.99

Split Pins: I used the ones that hold hole punched reams of paper together. They have two protruding blades that can be bent out easily. Get some with long blades as they provide more support for the phone when attached to the L plate.
Nut, bolts and washers: Just find a similar size to the original bolt that was fitted on your tripod. If you can find a wing nut to replace the nut you will find it easier to replace the mount to the original if you need to change cameras a lot.
Tape: The backs of some iPhone 4s and ipods are easily scratched. After all the purpose of the cover is to protect the phone in the first place. By putting some plastic electrical tape or similar over the blades of the split pins this can be easily avoided.
That’s it really, you should be able to build the whole tripod mount for under a tenner. I’m sure it could be made better with a little thought, but this should get you going quickly with the minimum of DIY skills.


View Original Website
